【jQuery】next()で指定した要素の次の兄弟要素を対象にする!

指定した要素の次の兄弟要素を対象にするにはjQueryでnext()を使用します。
next()とはマッチした要素の各要素の直後の兄弟要素を指定し、指定したセレクタの要素と同じ階層にある要素を取得することができるメソッドとなります。
そして、next()にパラメータに縛り込むセレクタを指定して使用すると、そのセレクタに一致する同じ階層にある兄弟要素を取得することができ、パラメータ無しで使用すると指定した要素の直後の兄弟要素を取得することができます。
また、nextAll()を使用することで指定した要素以降の兄弟要素を全て対象にすることができます。
今回は、jQueryのnext()を使って指定した要素の次の兄弟要素を対象にする方法について以下の内容で解説していきます。
⚫︎ セレクタに一致する要素の次の兄弟要素を対象にする場合
⚫︎ 指定した要素の直後の兄弟要素を対象にする場合
⚫︎ next()を複数繋げて使用する場合
⚫︎ 指定した要素以降の兄弟要素を全て対象にする方法
目次

今回はjQueryのnext()を使用して指定した要素の次の兄弟要素を対象にする方法について説明していきます。

はい!
お願いします!
next()とは
next()とはマッチした要素の各要素の直後の兄弟要素を取得するメソッドとなります。
next()の書き方
next()の書き方は下記となります。
|
1 |
$("セレクタ").next(["絞りこみたいセレクタ"]) |
パラメータ
⚫︎ 絞りこみたいセレクタ:
更に絞り込みたいセレクタを指定する
next()のパラメータに絞りこみたいセレクタを指定することで、そのセレクタに一致する兄弟要素を対象にすることができます。
また、next()をパラメータ無しで使用することでマッチした要素の各要素の直後の兄弟要素を取得することができます。
兄弟要素であることからセレクタで取得した要素と同じ階層にある要素を対象としますので注意してください。
指定した要素の次の兄弟要素を対象にするサンプルコード
next()で指定した要素の次の兄弟要素を対象にするサンプルコードを紹介します。
セレクタに一致する要素の次の兄弟要素を対象にする場合
セレクタに一致する要素の次の兄弟要素を対象にする場合はnext()のパラメータに絞りこみたいセレクタを指定します。
sample.html
|
1 2 3 4 5 6 7 8 9 10 11 12 13 14 15 16 17 18 19 20 21 22 23 24 25 26 27 28 29 30 31 32 33 34 35 36 |
<!DOCTYPE html> <html lang="ja"> <head> <meta charset="UTF-8"> <meta name="viewport" content="width=device-width, initial-scale=1.0"> <title>Document</title> <link rel="stylesheet" href="style.css"> <script src="https://ajax.googleapis.com/ajax/libs/jquery/3.4.1/jquery.min.js"></script> </head> <body> <h2>セレクタに一致する要素の次の兄弟要素を対象にする</h2> <div class= "samples" style= "margin: 15px 0;"> <p>要素一覧</p> <div class= "sample0"> <p class= "text">フライテックA1</p> </div> <div class= "sample0"> <p class= "text">フライテックA2</p> </div> <div class= "sample1"> <p class= "text">フライテックB1</p> </div> <div class= "sample1"> <p class= "text">フライテックB2</p> </div> <div class= "sample2"> <p class= "text">フライテックC</p> </div> </div> <div style= "margin-top: 150px;"> <input type= "button" class= "btnA" value= "sample0クラス要素を指定"> <input type= "button" class= "btnB" value= "sample1クラス要素を指定"> </div> <script src="index.js"></script> </body> </html> |
style.css
|
1 2 3 4 5 6 7 8 |
.sample0, .sample1, .sample2, .sample3{ width: 100px; height: 100px; background: white; border:solid 1px black; float:left; margin-bottom: 15px; } |
index.js
|
1 2 3 4 5 6 7 8 9 10 |
$(function(){ $(".btnA").click(function() { //p要素の直下の兄弟クラスを指定 $("p").next(".sample0").css("background", "blue"); }); $(".btnB").click(function() { //samole0クラスの直下の兄弟クラスを指定 $(".sample0").next(".sample1").css("background", "green"); }); }); |
出力結果
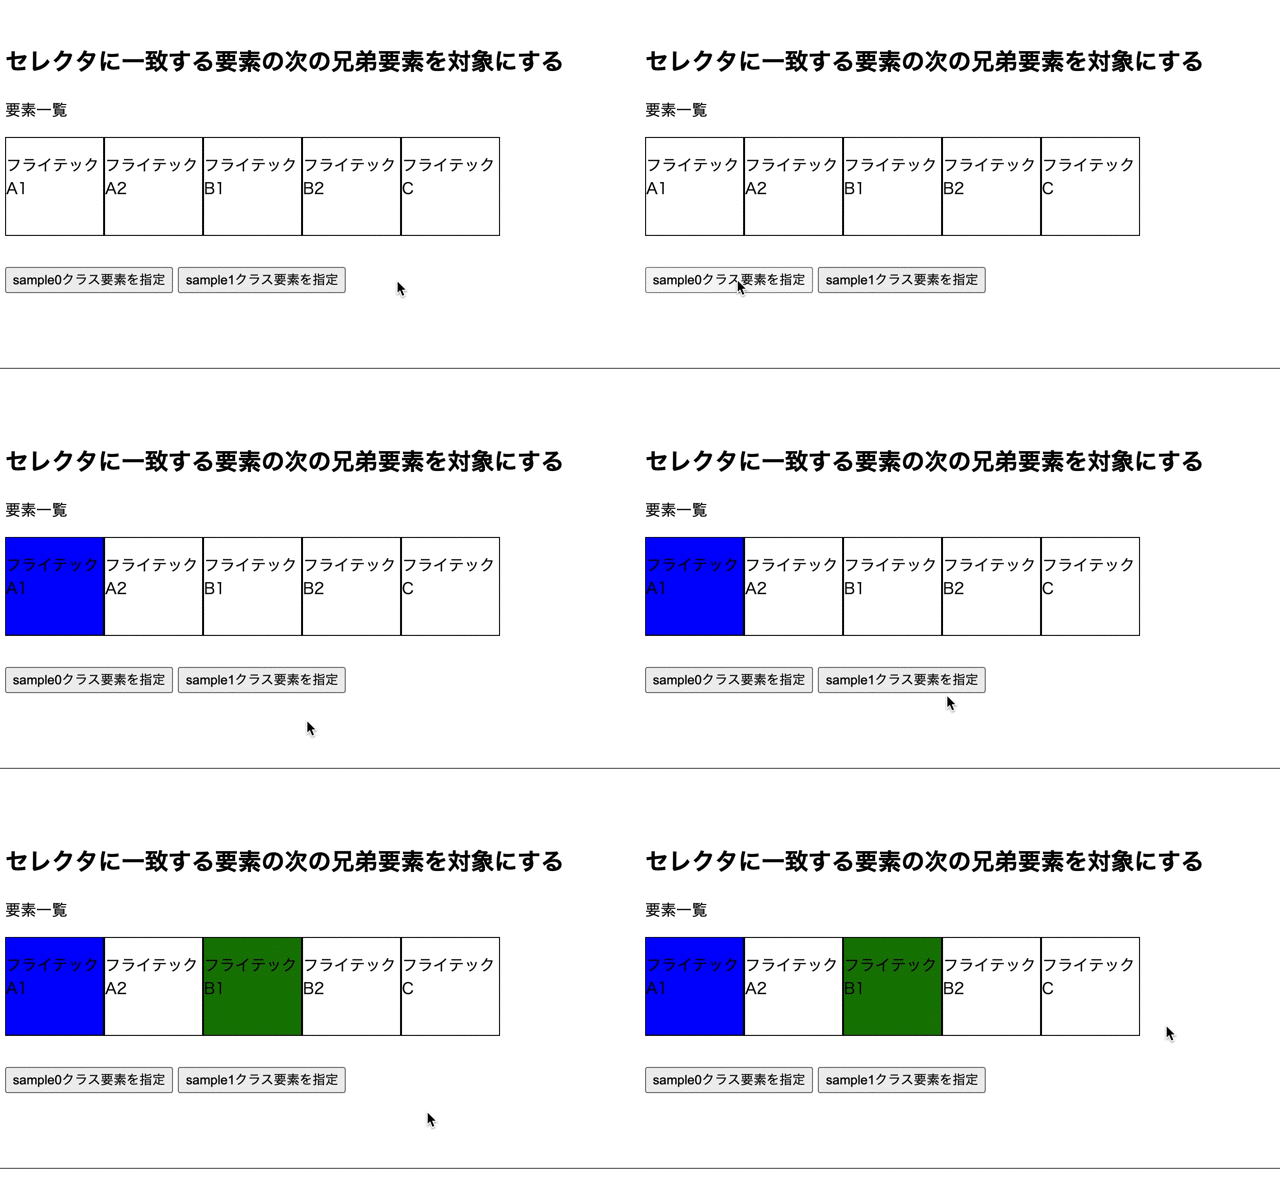
next()メソッドのパラメータに絞りこみたいセレクタを指定することでセレクタに一致する要素の直下の兄弟要素を対象にすることができます。
そのため、ボタンを押すと、sample0の最初の要素とsample1クラスの最初の要素の背景色が変更されます。

next()のパラメータに絞りこみたいセレクタを指定することでセレクタに一致する直下の兄弟要素を対象にしていますね!

そうですね。
next()は指定したセレクタの要素の直下の要素のみを対象にします。
その為、絞りこみたいセレクタが複数あったとしても指定したセレクタの要素の直下にある要素のみを対象とします。
指定した要素の直後の兄弟要素を対象にする場合
指定した要素の直後の兄弟要素を対象にする場合はnext()メソッドをパラメータ無しで使用します。
sample.html
|
1 2 3 4 5 6 7 8 9 10 11 12 13 14 15 16 17 18 19 20 21 22 23 24 25 26 27 28 29 30 31 32 33 34 |
<!DOCTYPE html> <html lang="ja"> <head> <meta charset="UTF-8"> <meta name="viewport" content="width=device-width, initial-scale=1.0"> <title>Document</title> <link rel="stylesheet" href="style.css"> <script src="https://ajax.googleapis.com/ajax/libs/jquery/3.4.1/jquery.min.js"></script> </head> <body> <h2>指定した要素の直後の兄弟要素を対象にする</h2> <div class= "samples" style= "margin: 15px 0;"> <p>要素一覧</p> <div class= "sample1"> <p class= "text1">フライテック1</p> <p></p> </div> <div class= "sample2"> <p>フライテック2</p> </div> <div class= "sample3"> <p>フライテック3</p> </div> <div class= "sample4"> <p>フライテック4</p> </div> </div> <div style= "margin-top: 200px;"> <input type= "button" class= "btnA" value= "text1クラス要素を指定"> <input type= "button" class= "btnB" value= "sample1クラス要素を指定"> </div> <script src="index.js"></script> </body> </html> |
style.css
|
1 2 3 4 5 6 7 8 |
.sample1, .sample2, .sample3, .sample4 { width: 150px; height: 150px; background: gray; float:left; border:solid 1px black; margin-bottom: 15px; } |
index.js
|
1 2 3 4 5 6 7 8 9 10 |
$(function(){ $(".btnA").click(function() { //text1クラスの兄弟要素を指定 $(".text1").next().text("フライテック0"); }); $(".btnB").click(function() { //sample1クラスの兄弟要素を指定 $(".sample1").next().css("background", "tomato"); }); }); |
出力結果
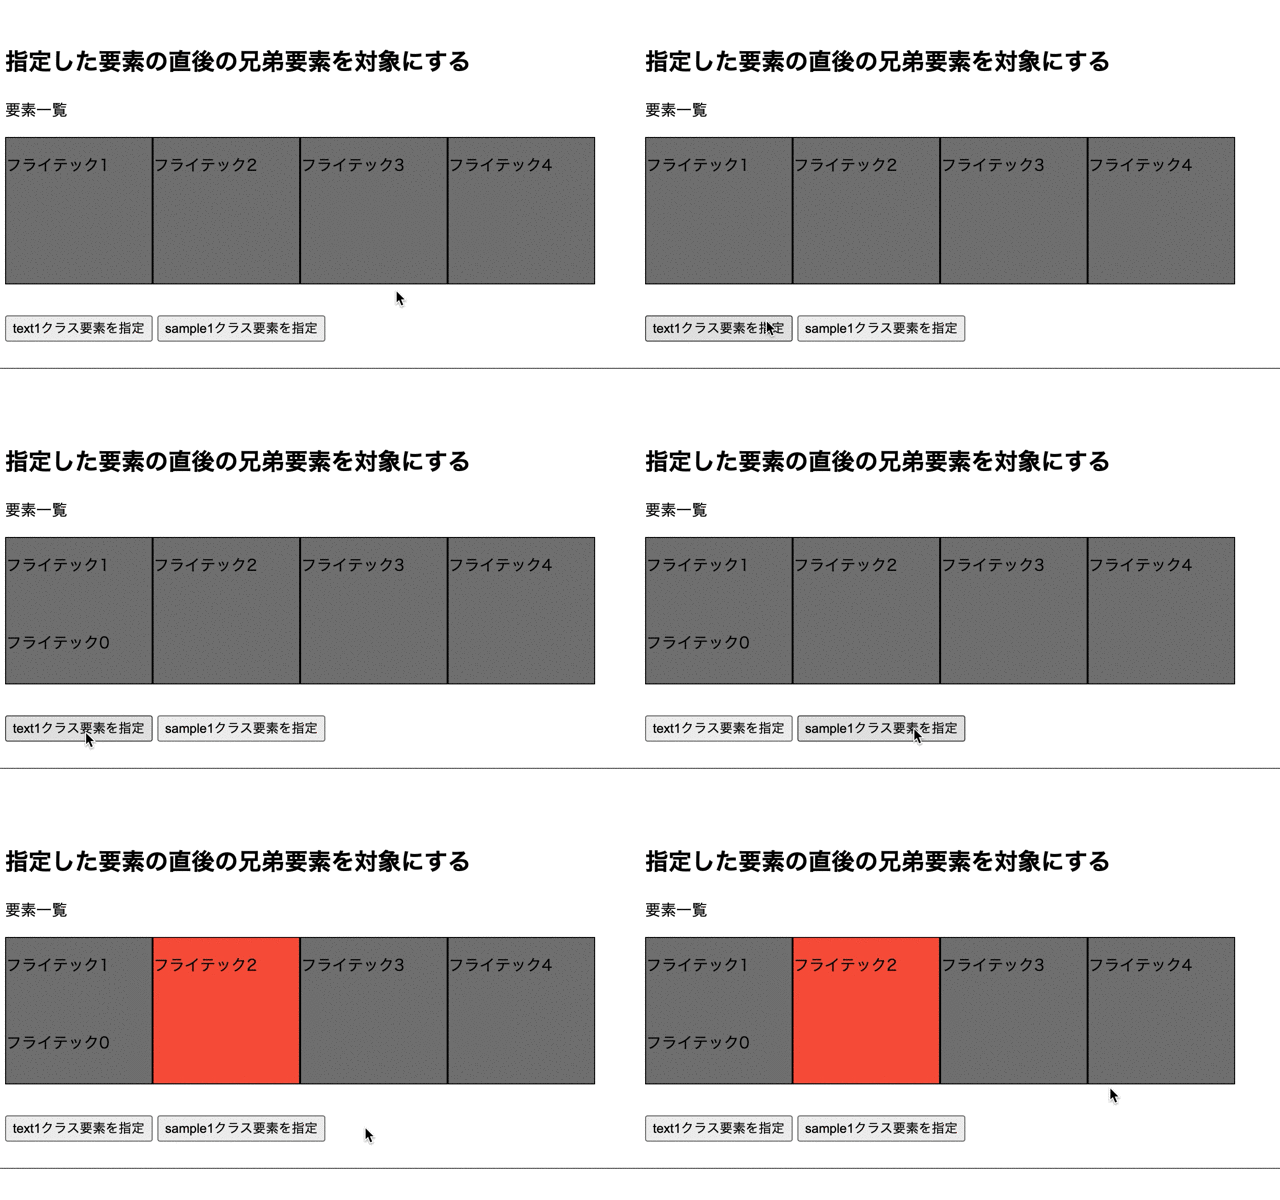
next()メソッドをパラメータ無しで使用することで、指定した要素の直後の兄弟要素を対象にすることができます。
その為、ボタンを押すと、フライテック1の下に「フライテック0」が表示され、フライテック2の要素の背景色が変更されます。

next()メソッドをパラメータ無しでい使用すると指定したセレクタの直下にある次の兄弟要素を対象にするんですね!

そうですね。
next()メソッドをパラメータ無しで使用するということは条件を設定しないで使用することになります。
つまり、next()メソッドそのままの動きが実行されます。
next()を複数繋げて使用する場合
next()を複数繋げて使用することで繋げて使用した位置の兄弟要素が対象になります。
sample.html
|
1 2 3 4 5 6 7 8 9 10 11 12 13 14 15 16 17 18 19 20 21 22 23 24 25 26 27 28 29 30 31 32 33 34 35 36 37 38 |
<!DOCTYPE html> <html lang="ja"> <head> <meta charset="UTF-8"> <meta name="viewport" content="width=device-width, initial-scale=1.0"> <title>Document</title> <link rel="stylesheet" href="style.css"> <script src="https://ajax.googleapis.com/ajax/libs/jquery/3.4.1/jquery.min.js"></script> </head> <body> <h2>next()を複数繋げて使用する</h2> <div class= "samples" style= "margin: 15px 0;"> <p>要素一覧</p> <div class= "sample1"> <p class= "text1">フライテック10</p> <p>フライテック10-1</p> <p></p> </div> <div class= "sample2"> <p>フライテック11</p> </div> <div class= "sample3"> <p>フライテック12</p> </div> <div class= "sample4"> <p>フライテック13</p> </div> <div class= "sample5"> <p>フライテック14</p> </div> </div> <div style= "margin-top: 200px;"> <input type= "button" class= "btnA" value= "sample4クラス要素を指定"> <input type= "button" class= "btnB" value= "テキストを追加"> </div> <script src="index.js"></script> </body> </html> |
style.css
|
1 2 3 4 5 6 7 8 |
.sample1, .sample2, .sample3, .sample4 , .sample5{ width: 150px; height: 150px; background: pink; float:left; border:solid 1px black; margin-bottom: 15px; } |
index.js
|
1 2 3 4 5 6 7 8 9 10 |
$(function(){ $(".btnA").click(function() { //sample1クラスの兄弟要素を指定 $(".sample1").next().next().next().css("background", "lightgreen"); }); $(".btnB").click(function() { //text1クラスの兄弟要素を指定 $(".text1").next().next().text("テキスト追加"); }); }); |
出力結果
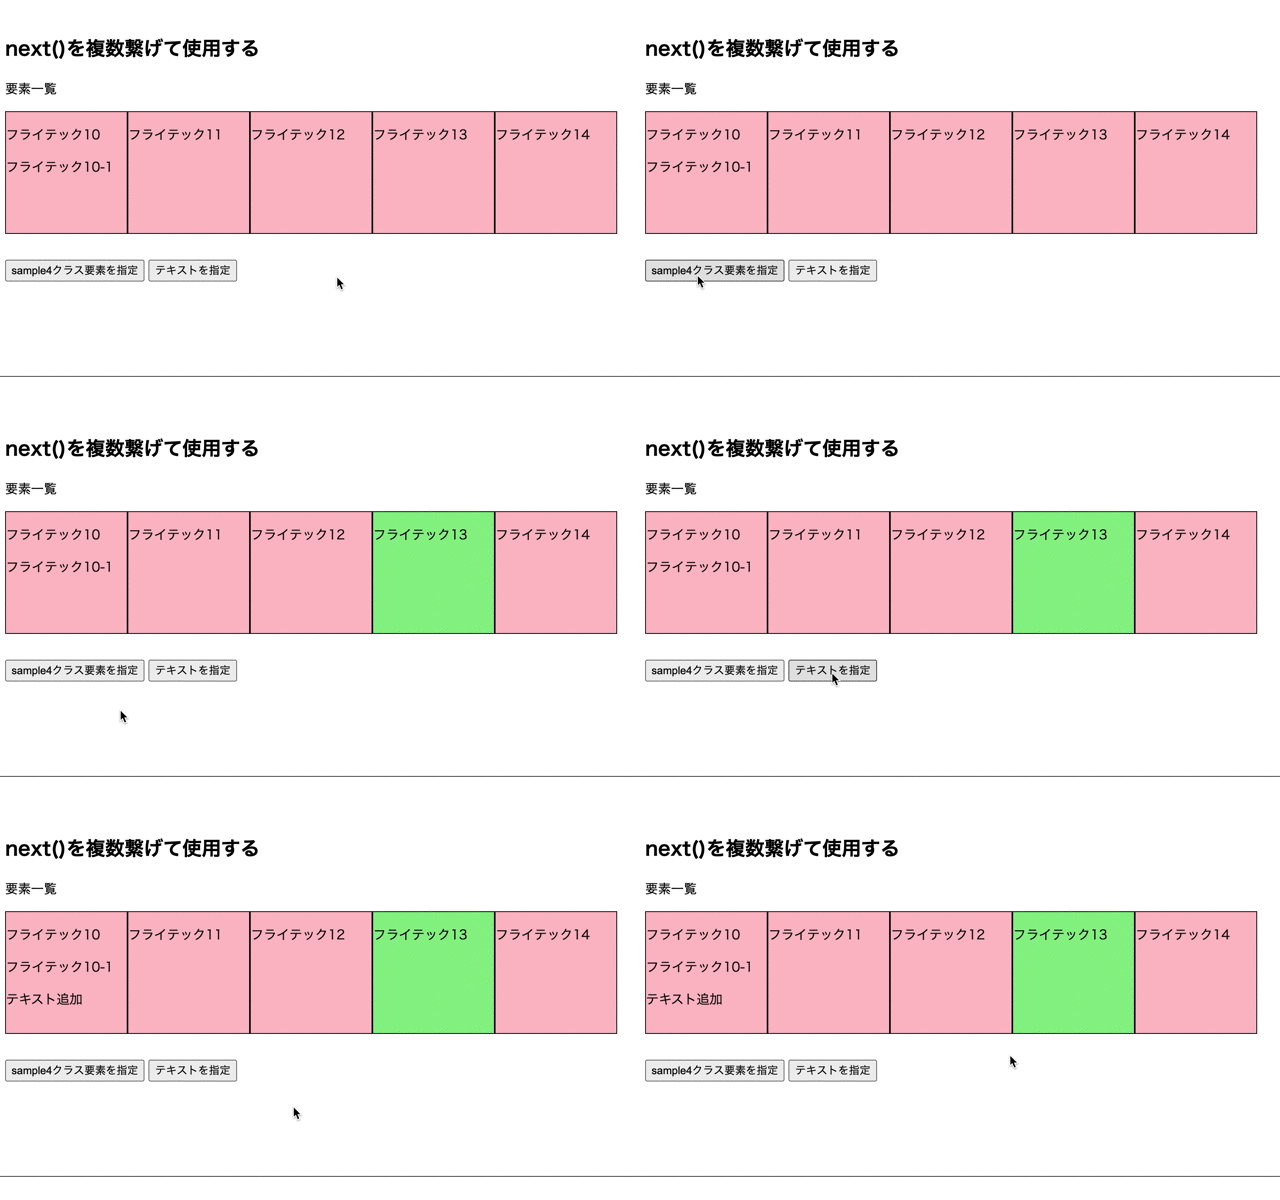
next()メソッドを複数繋げて使用することで、指定した要素から繋げて使用した回数分の兄弟要素を対象にすることができます。
その為、ボタンを押すと、フライテック13の要素の背景色が変更され、フライテック10-1の下に「テキスト追加」が表示されます。
指定した要素以降の兄弟要素を全て対象にする方法
指定した要素以降の兄弟要素を全て対象にするにはjQueryのnextAll()メソッドを使用します。
sample.html
|
1 2 3 4 5 6 7 8 9 10 11 12 13 14 15 16 17 18 19 20 21 22 23 24 25 26 27 28 29 30 31 32 33 34 35 |
<!DOCTYPE html> <html lang="ja"> <head> <meta charset="UTF-8"> <meta name="viewport" content="width=device-width, initial-scale=1.0"> <title>Document</title> <link rel="stylesheet" href="style.css"> <script src="https://ajax.googleapis.com/ajax/libs/jquery/3.4.1/jquery.min.js"></script> </head> <body> <h2>nextAll()で指定した要素以降の兄弟要素を全て対象にする</h2> <div class= "samples" style= "margin: 15px 0;"> <p>要素一覧</p> <div class= "sample0"> <p class= "text">フライテックA</p> </div> <div class= "sample1"> <p class= "text">フライテックB</p> </div> <div class= "sample2"> <p class= "text">フライテックC</p> </div> <div class= "sample3"> <p class= "text">フライテックD</p> </div> <div class= "sample4"> <p class= "text">フライテックE</p> </div> </div> <div style= "margin-top: 150px;"> <input type= "button" class= "btnA" value= "nextAll()で要素を指定"> </div> <script src="index.js"></script> </body> </html> |
style.css
|
1 2 3 4 5 6 7 8 |
.sample0, .sample1, .sample2, .sample3, .sample4{ width: 100px; height: 100px; background: skyblue; border:solid 1px black; float:left; margin-bottom: 15px; } |
index.js
|
1 2 3 4 5 |
$(function(){ $(".btnA").click(function() { $("p").nextAll().css("background", "red"); }); }); |
出力結果
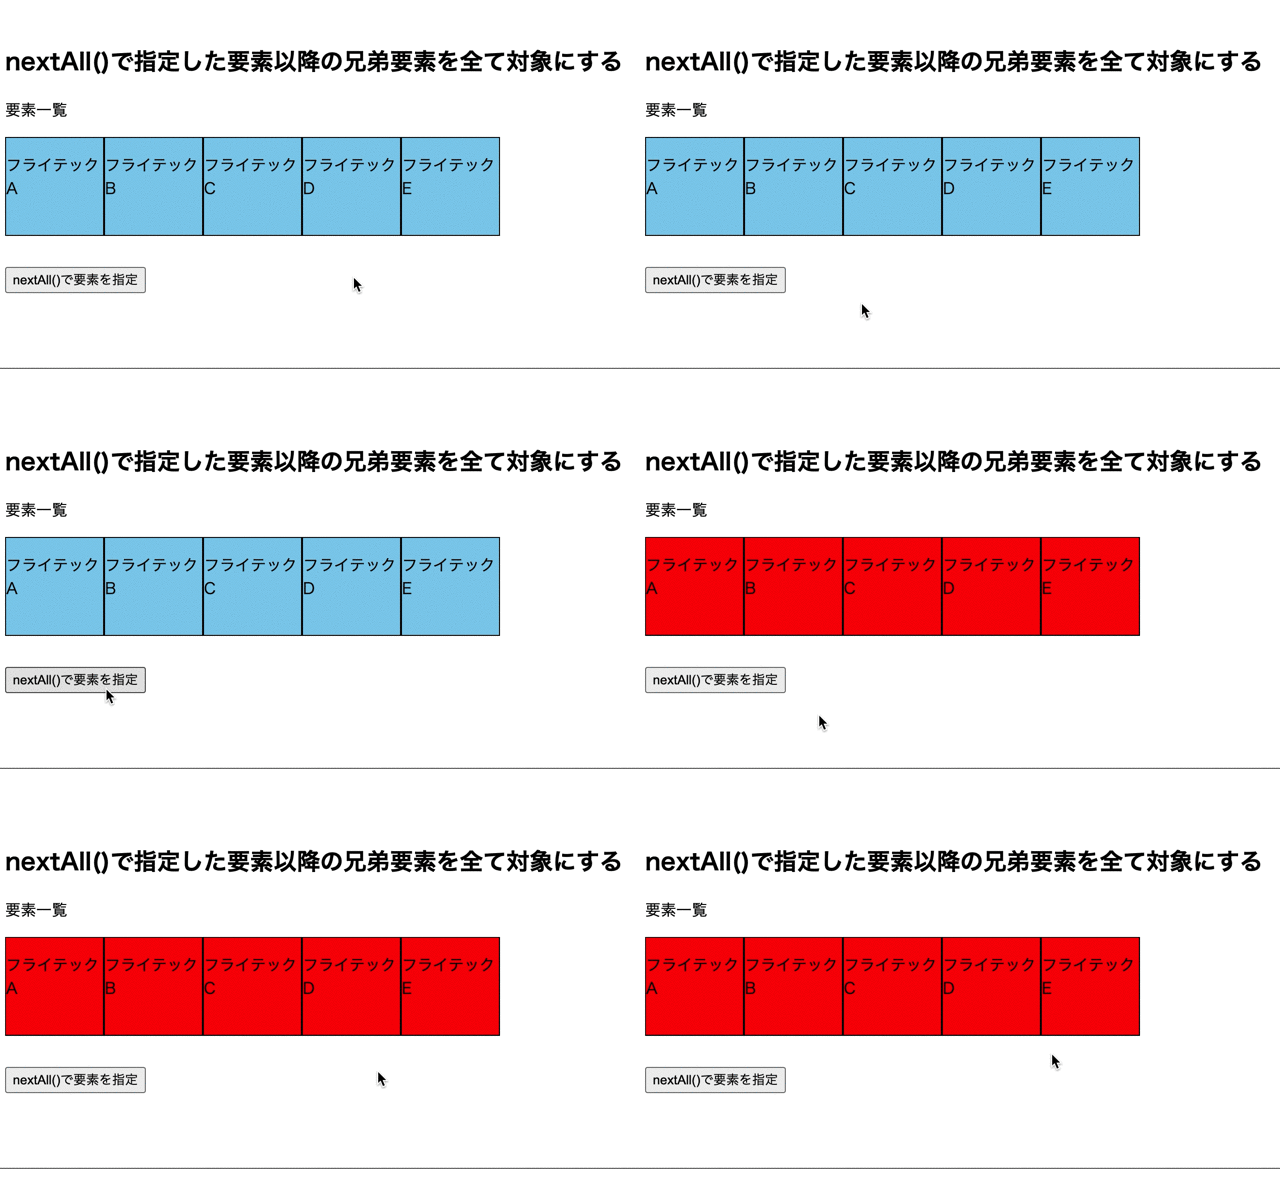
nextAll()を使用することで指定した要素以降の兄弟要素を全て対象にすることができます。
その為、ボタンを押すとsample1クラス以降の要素の背景色が変更されます。
nexaAll()メソッドについて詳しく知りたい場合はこちらをご参考ください。
今回のポイント
next()で指定要素の次の兄弟要素を対象
⚫︎ 指定した要素の次の兄弟要素を対象にするにはjQueryのnext()メソッドを使用する
⚫︎ セレクタに一致する要素の次の兄弟要素を対象にする場合はnext()メソッドのパラメータに絞りこみたいセレクタを指定する
⚫︎ 指定した要素の直後の兄弟要素を対象にする場合はnext()メソッドをパラメータ無しで使用する
⚫︎ next()メソッドを複数繋げて使用すると、指定した要素から繋げて使用した回数分の兄弟要素を対象にすることができる
⚫︎ 指定した要素以降の兄弟要素を全て対象にするにはjQueryのnextAll()メソッドを使用する
関連記事
jQueryのprev()で指定した要素の前の兄弟要素を対象にする方法についてはこちらをご参考ください。
ST
株式会社flyhawkのSTです。フライテックメディア事業部でのメディア運営・ライター業務なども担当。愛機はMac Book AirとThinkPad。好きな言語:swift、JS系(Node.js等)。好きなサーバー:AWS。受託開発やプログラミングスクールの運営をしております。ご気軽にお問い合わせください。


