【Python】tkinterを使って簡易な電卓を作成してみた!
PythonのtkinterはGUIの画面にボタンやチェックボックス、ラジオボタン、文字を表示するためのラベルなどのウィジェットを配置できるモジュールであり、簡単なものから本格的なものまで幅広い範囲でアプリケーションを作成することができます。
その為、今回はPythonのtkinterを使って簡易な電卓を作成してみました。
完成品が以下のようになります。
完成品
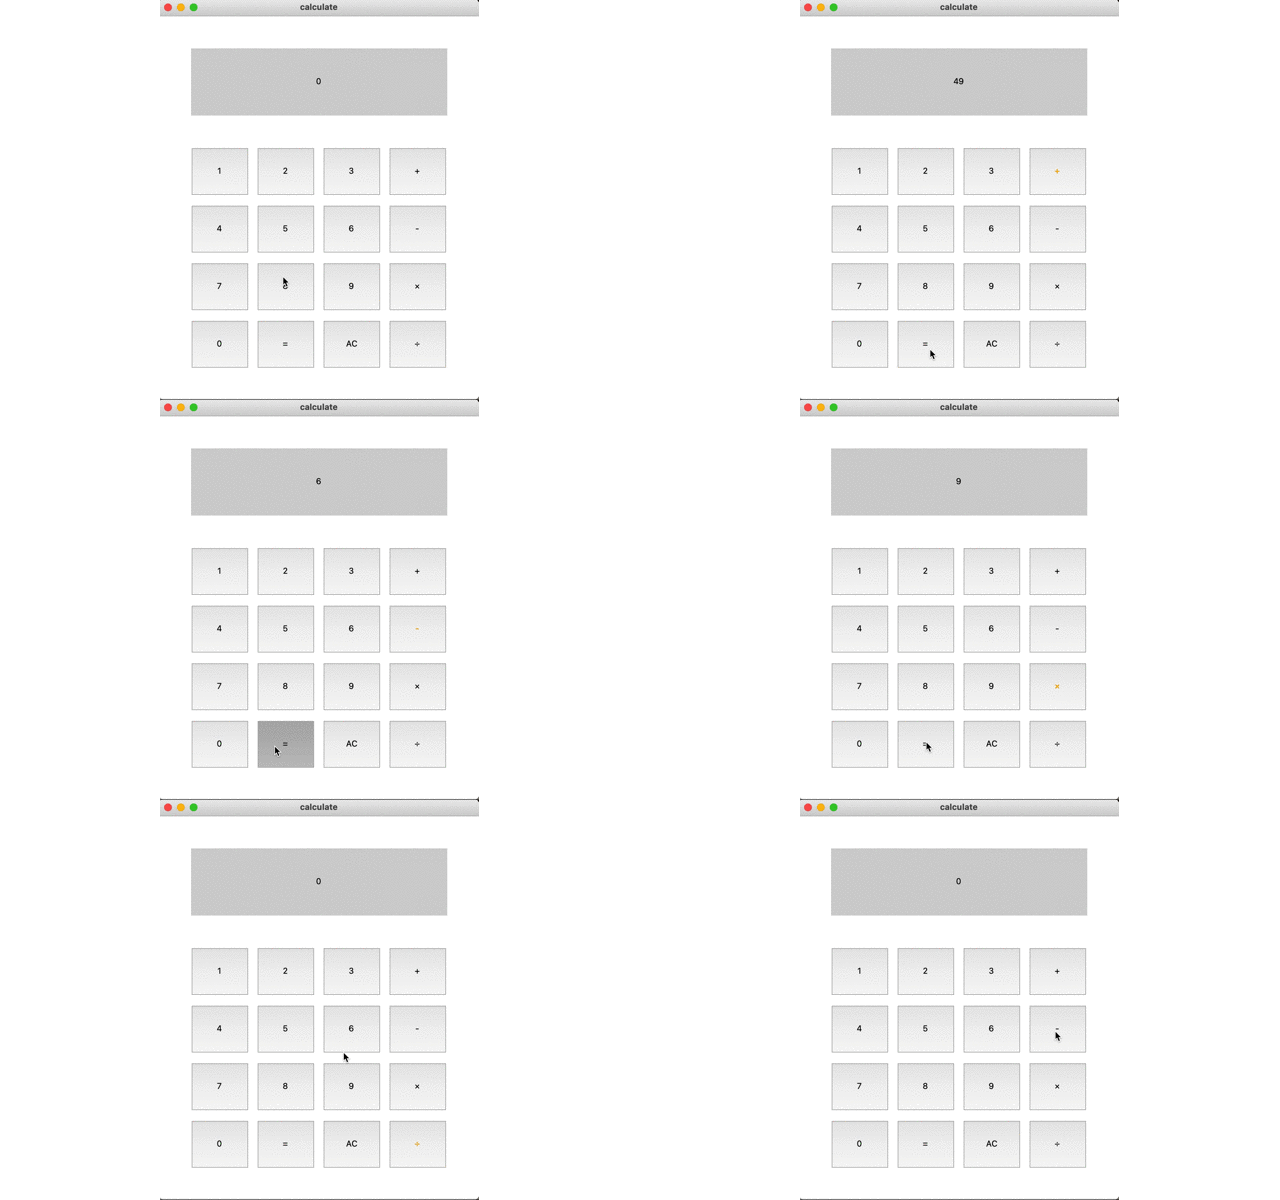
もし、tkinterを使っているけど何を作ろうか考えているる方はこの記事を参考にしてオリジナルの電卓を作成してみてください。
目次
tkinterとは
tkinterとはPython標準のGUIの画面にボタンやチェックボックス、ラジオボタン、文字を表示するためのラベルなどのウィジェットを配置できるモジュールになります。
その為、ボタンを押して操作するなど簡単なものから本格的なものまで幅広い範囲でアプリケーションを作成することができます。
Pythonのtkinterの使い方について詳しく知りたい場合はこちらをご参考ください。
tkinterで電卓を作成する方法
それでは、tkinterを使って電卓を作成していきましょう。
今回はこの3つの段階に分けて作成していきます。
⚫︎ 電卓の完成品をイメージする
⚫︎ ウィジェットを画面に配置する
⚫︎ ボタンを押した時のイベントを設定する
電卓の完成品をイメージする
まずは、電卓の完成品をイメージしていきます。
完成品のイメージは下記のような画像となります。
電卓の完成のイメージ
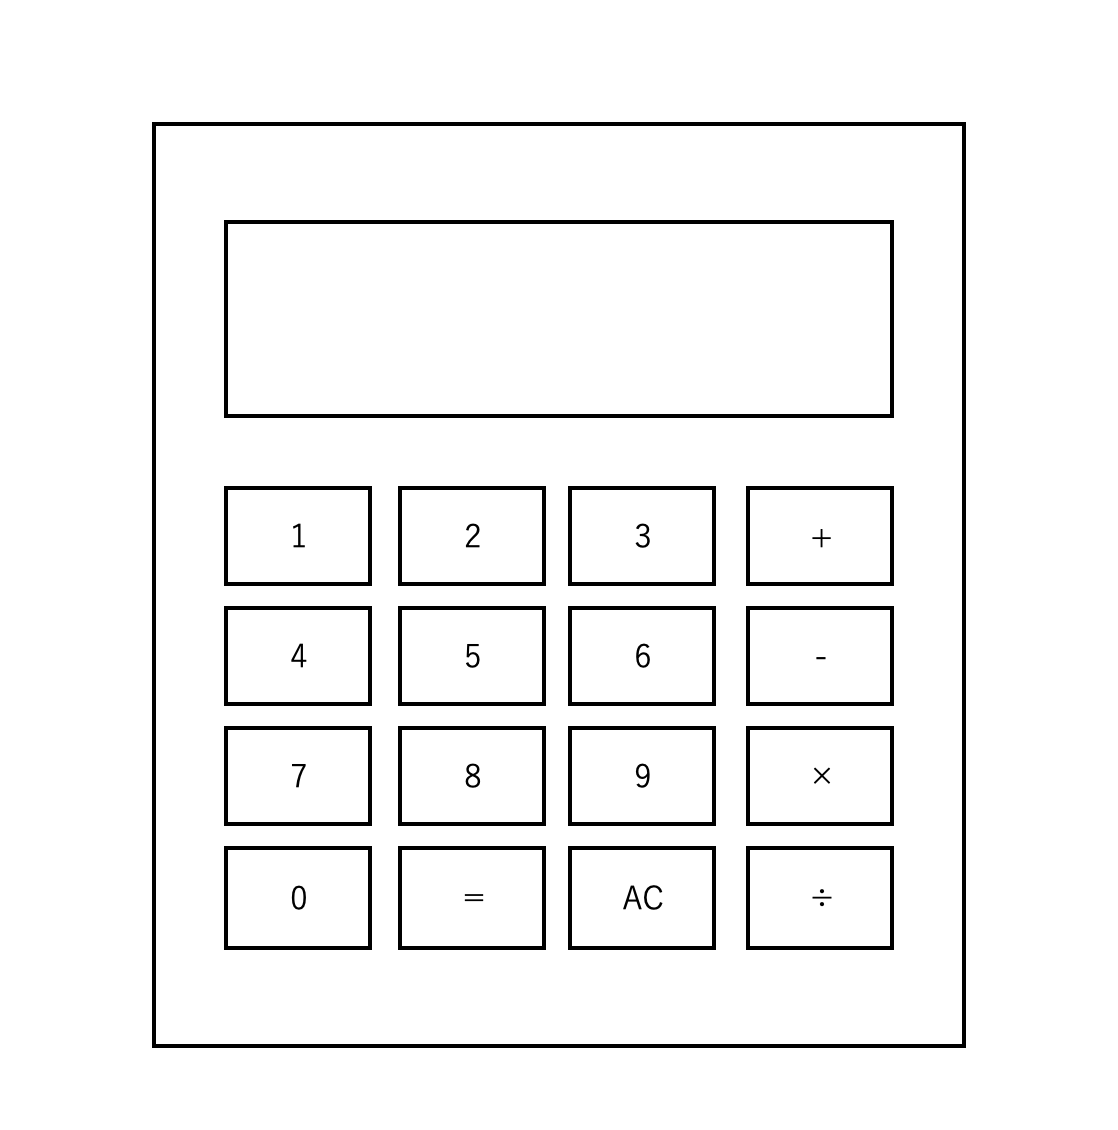
画像のような電卓を作成するには何が何個必要で、どのようにコードを書けば良いのかイメージしましょう。
今回、「+」や「-」などの正の数や負の数、色などのデザインは省略しています。
ウィジェットを画面に配置する
設計書で電卓の完成品のイメージができましたら、次はウィジェットを画面に配置していきましょう。
今回、使用するのはボタンが16個とラベルが1つになります。
そして、たくさんのウィジェットを設置するので今回はplace()メソッドを使って配置していきます。
もし、tkinterのplace()メソッドについて詳しく知りたい場合はこちらをご参考ください。
calc.py
|
1 2 3 4 5 6 7 8 9 10 11 12 13 14 15 16 17 18 19 20 21 22 23 24 25 26 27 28 29 30 31 |
import tkinter as tk # メインウィンドウを作成 baseGround = tk.Tk() # ウィンドウのサイズを設定 baseGround.geometry('500x600') # 画面タイトル baseGround.title('calculater') # ラベルやボタンの作成と配置 label = tk.Label(baseGround,text = '', background='lightgray').place(x=50, y=50, width=400, height=105) button1 = tk.Button(baseGround,text = '1').place(x=50, y=205, relwidth=0.18, relheight= 0.125) button2 = tk.Button(baseGround,text = '2').place(x=153, y=205, relwidth=0.18, relheight= 0.125) button3 = tk.Button(baseGround,text = '3').place(x=256, y=205, relwidth=0.18, relheight= 0.125) buttonPlus = tk.Button(baseGround,text = '+').place(x=359, y=205, relwidth=0.18, relheight= 0.125) button4 = tk.Button(baseGround,text = '4').place(x=50, y=295, relwidth=0.18, relheight= 0.125) button5 = tk.Button(baseGround,text = '5').place(x=153, y=295, relwidth=0.18, relheight= 0.125) button6 = tk.Button(baseGround,text = '6').place(x=256, y=295, relwidth=0.18, relheight= 0.125) buttonMinus = tk.Button(baseGround,text = '-').place(x=359, y=295, relwidth=0.18, relheight= 0.125) button7 = tk.Button(baseGround,text = '7').place(x=50, y=385, relwidth=0.18, relheight= 0.125) button8 = tk.Button(baseGround,text = '8').place(x=153, y=385, relwidth=0.18, relheight= 0.125) button9 = tk.Button(baseGround,text = '9').place(x=256, y=385, relwidth=0.18, relheight= 0.125) buttonMulti = tk.Button(baseGround,text = '×').place(x=359, y=385, relwidth=0.18, relheight= 0.125) button0 = tk.Button(baseGround,text = '0').place(x=50, y=475, relwidth=0.18, relheight= 0.125) buttonEqual = tk.Button(baseGround,text = '=').place(x=153, y=475, relwidth=0.18, relheight= 0.125) buttonAc = tk.Button(baseGround,text = 'AC').place(x=256, y=475, relwidth=0.18, relheight= 0.125) buttonDived = tk.Button(baseGround,text = '÷').place(x=359, y=475, relwidth=0.18, relheight= 0.125) baseGround.mainloop() |
出力結果
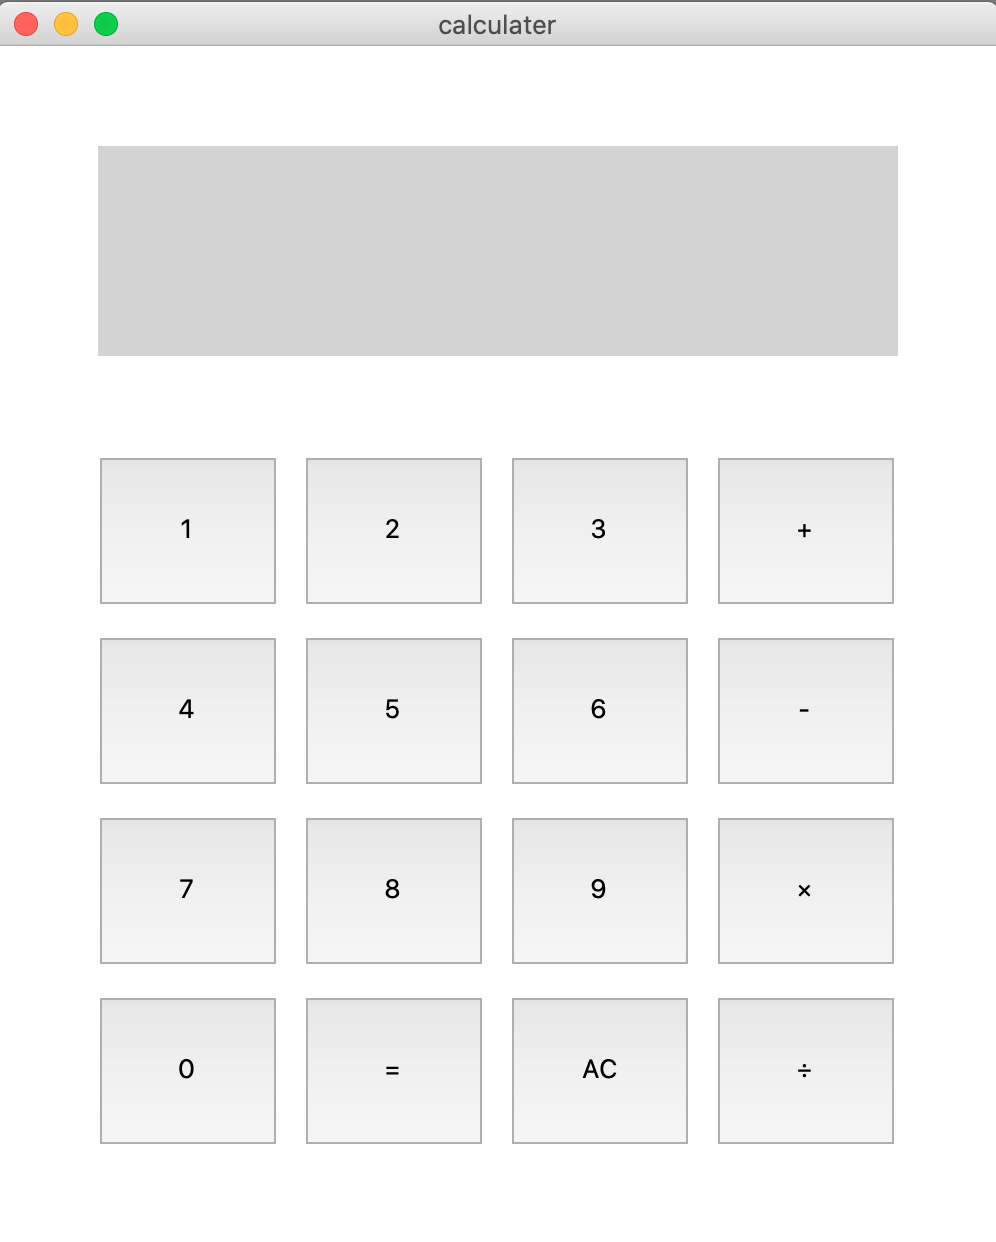
ウィジェットを画面に配置することができました。
ボタンを押した時のイベントを設定する
ウィジェットを画面に配置することができましたら、最後にボタンを押した時のイベントを設定します。
ボタンを押した時のイベントは以下のように設定していきます。
⚫︎ 数字のボタン:
押すとラベルにボタンの数字が表示される
⚫︎ 符号のボタン:
押すとボタンの色が変わり、ラベルの値が「0」になる
⚫︎ ACボタン:
押すとラベルの値が「0」になり、符号のボタンの色が元に戻る
⚫︎ =(イコール)ボタン:
押すと計算された値が表示される
sample.py
|
1 2 3 4 5 6 7 8 9 10 11 12 13 14 15 16 17 18 19 20 21 22 23 24 25 26 27 28 29 30 31 32 33 34 35 36 37 38 39 40 41 42 43 44 45 46 47 48 49 50 51 52 53 54 55 56 57 58 59 60 61 62 63 64 65 66 67 68 69 70 71 72 73 74 75 76 77 78 79 80 81 82 83 84 85 86 87 88 89 90 91 92 93 94 95 96 97 98 99 100 101 102 103 104 105 106 107 108 109 110 111 112 113 114 115 116 117 118 119 120 121 122 123 124 125 126 127 128 129 130 131 132 133 134 135 136 137 138 139 140 141 142 143 144 145 146 147 148 149 150 151 152 153 154 155 156 157 158 159 160 161 162 163 164 165 166 167 168 169 170 171 172 173 174 175 176 177 178 179 180 |
import tkinter as tk def click_btn1(): if label['text'] == '0': label['text'] = '1' else: label['text'] = label['text'] +'1' def click_btn2(): if label['text'] == '0': label['text'] = '2' else: label['text'] = label['text'] +'2' def click_btn3(): if label['text'] == '0': label['text'] = '3' else: label['text'] = label['text'] +'3' def click_btn4(): if label['text'] == '0': label['text'] = '4' else: label['text'] = label['text'] +'4' def click_btn5(): if label['text'] == '0': label['text'] = '5' else: label['text'] = label['text'] +'5' def click_btn6(): if label['text'] == '0': label['text'] = '6' else: label['text'] = label['text'] +'6' def click_btn7(): if label['text'] == '0': label['text'] = '7' else: label['text'] = label['text'] +'7' def click_btn8(): if label['text'] == '0': label['text'] = '8' else: label['text'] = label['text'] +'8' def click_btn9(): if label['text'] == '0': label['text'] = '9' else: label['text'] = label['text'] +'9' def click_btn0(): if label['text'] == '0': label['text'] = '0' else: label['text'] = label['text'] +'0' def click_btnAc(): label['text'] = '0' buttonPlus['fg'] = "black" buttonMinus['fg'] = "black" buttonMulti['fg'] = "black" buttonDived['fg'] = "black" def click_btnPlus(): global box global hugo box = label['text'] label['text'] = '0' hugo = "+" buttonPlus['fg'] = "orange" buttonMinus['fg'] = "black" buttonMulti['fg'] = "black" buttonDived['fg'] = "black" def click_btnMinus(): global box global hugo box = label['text'] label['text'] = '0' hugo = '-' buttonPlus['fg'] = "black" buttonMinus['fg'] = "orange" buttonMulti['fg'] = "black" buttonDived['fg'] = "black" def click_btnMulti(): global box global hugo box = label['text'] label['text'] = '0' hugo = "×" buttonPlus['fg'] = "black" buttonMinus['fg'] = "black" buttonMulti['fg'] = "orange" buttonDived['fg'] = "black" def click_btnDived(): global box global hugo box = label['text'] label['text'] = '0' hugo = "÷" buttonPlus['fg'] = "black" buttonMinus['fg'] = "black" buttonMulti['fg'] = "black" buttonDived['fg'] = "orange" def click_btnEqual(): box_Int1 = int(box) box2 = label['text'] box_Int2 = int(box2) if hugo == '+': result = box_Int1 + box_Int2 label['text'] = result elif hugo == '-': result = box_Int1 - box_Int2 label['text'] = result elif hugo == '×': result = box_Int1 * box_Int2 label['text'] = result elif hugo == '÷': result = box_Int1 / box_Int2 label['text'] = result else: label['text'] = 'Error' baseGround = tk.Tk() baseGround.title('calculate') baseGround.geometry('500x600') # ラベルやボタンの作成と配置 label = tk.Label(baseGround, text='0', background='lightgray') label.place(x=50, y=50, width=400, height=105) button1 = tk.Button(baseGround,text = '1', command=click_btn1) button1.place(x=50, y=205, relwidth=0.18, relheight= 0.125) button2 = tk.Button(baseGround,text = '2', command=click_btn2) button2.place(x=153, y=205, relwidth=0.18, relheight= 0.125) button3 = tk.Button(baseGround,text = '3', command=click_btn3) button3.place(x=256, y=205, relwidth=0.18, relheight= 0.125) buttonPlus = tk.Button(baseGround,text = '+', command=click_btnPlus) buttonPlus.place(x=359, y=205, relwidth=0.18, relheight= 0.125) button4 = tk.Button(baseGround,text = '4', command=click_btn4) button4.place(x=50, y=295, relwidth=0.18, relheight= 0.125) button5 = tk.Button(baseGround,text = '5', command=click_btn5) button5.place(x=153, y=295, relwidth=0.18, relheight= 0.125) button6 = tk.Button(baseGround,text = '6', command=click_btn6) button6.place(x=256, y=295, relwidth=0.18, relheight= 0.125) buttonMinus = tk.Button(baseGround,text = '-', command=click_btnMinus) buttonMinus.place(x=359, y=295, relwidth=0.18, relheight= 0.125) button7 = tk.Button(baseGround,text = '7', command=click_btn7) button7.place(x=50, y=385, relwidth=0.18, relheight= 0.125) button8 = tk.Button(baseGround,text = '8', command=click_btn8) button8.place(x=153, y=385, relwidth=0.18, relheight= 0.125) button9 = tk.Button(baseGround,text = '9', command=click_btn9) button9.place(x=256, y=385, relwidth=0.18, relheight= 0.125) buttonMulti = tk.Button(baseGround,text = '×', command=click_btnMulti) buttonMulti.place(x=359, y=385, relwidth=0.18, relheight= 0.125) button0 = tk.Button(baseGround,text = '0', command=click_btn0) button0.place(x=50, y=475, relwidth=0.18, relheight= 0.125) buttonEqual = tk.Button(baseGround,text = '=', command=click_btnEqual) buttonEqual.place(x=153, y=475, relwidth=0.18, relheight= 0.125) buttonAc = tk.Button(baseGround,text = 'AC', command=click_btnAc) buttonAc.place(x=256, y=475, relwidth=0.18, relheight= 0.125) buttonDived = tk.Button(baseGround,text = '÷', command=click_btnDived) buttonDived.place(x=359, y=475, relwidth=0.18, relheight= 0.125) baseGround.mainloop() |
出力結果

これで電卓が完成しました。
本物の電卓と比べると機能は少ないですが、基本的な動きは満たしています。
まとめ
tkinterを使って簡易な電卓を作成してみたが、とても簡単に作成できました。
デザインや文字の大きさ、値の位置などは修正していませんが、もう少し時間をかけて作成すると本格的な電卓が作成できると思います。
また、コードの量が長くなっていますので、まとめることができることろはまとめて書いた方がいいですね。
ST
株式会社flyhawkのSTです。フライテックメディア事業部でのメディア運営・ライター業務なども担当。愛機はMac Book AirとThinkPad。好きな言語:swift、JS系(Node.js等)。好きなサーバー:AWS。受託開発やプログラミングスクールの運営をしております。ご気軽にお問い合わせください。


