【Python】tkinterで割り勘アプリを作ってみた!
PythonのtkinterはGUIの画面にボタンやチェックボックス、ラジオボタン、文字を表示するためのラベルなどのウィジェットを配置できるモジュールであり、簡単なものから本格的なものまで幅広い範囲でアプリケーションを作成することができます。
その為、今回はPythonのtkinterを使って割り勘アプリを作成してみました。
飲食店のタブレットの中にある割り勘する機能を参考にして作成してみましたので、もし興味のある方はこの記事を参考に作成してみてください。
目次
tkinterとは
tkinterとはPython標準のGUIの画面にボタンやチェックボックス、ラジオボタン、文字を表示するためのラベルなどのウィジェットを配置できるモジュールになります。
その為、ボタンを押して操作するなど簡単なものから本格的なものまで幅広い範囲でアプリケーションを作成することができます。
Pythonのtkinterの使い方について詳しく知りたい場合はこちらをご参考ください。
tkinterで割り勘アプリを作成する方法
それでは、tkinterを使って割り勘アプリを作成していきましょう。
今回はこの3つの段階に分けて作成していきます。
⚫︎ 割り勘アプリの完成品をイメージする
⚫︎ ウィジェットを画面に配置する
⚫︎ ボタンを押した時のイベントを設定する
⚫︎ 例外処理を設定する
割り勘アプリの完成品をイメージする
まずは、割り勘アプリの完成品をイメージしていきます。
完成品のイメージは下記のような画像となります。
割り勘アプリの完成のイメージ
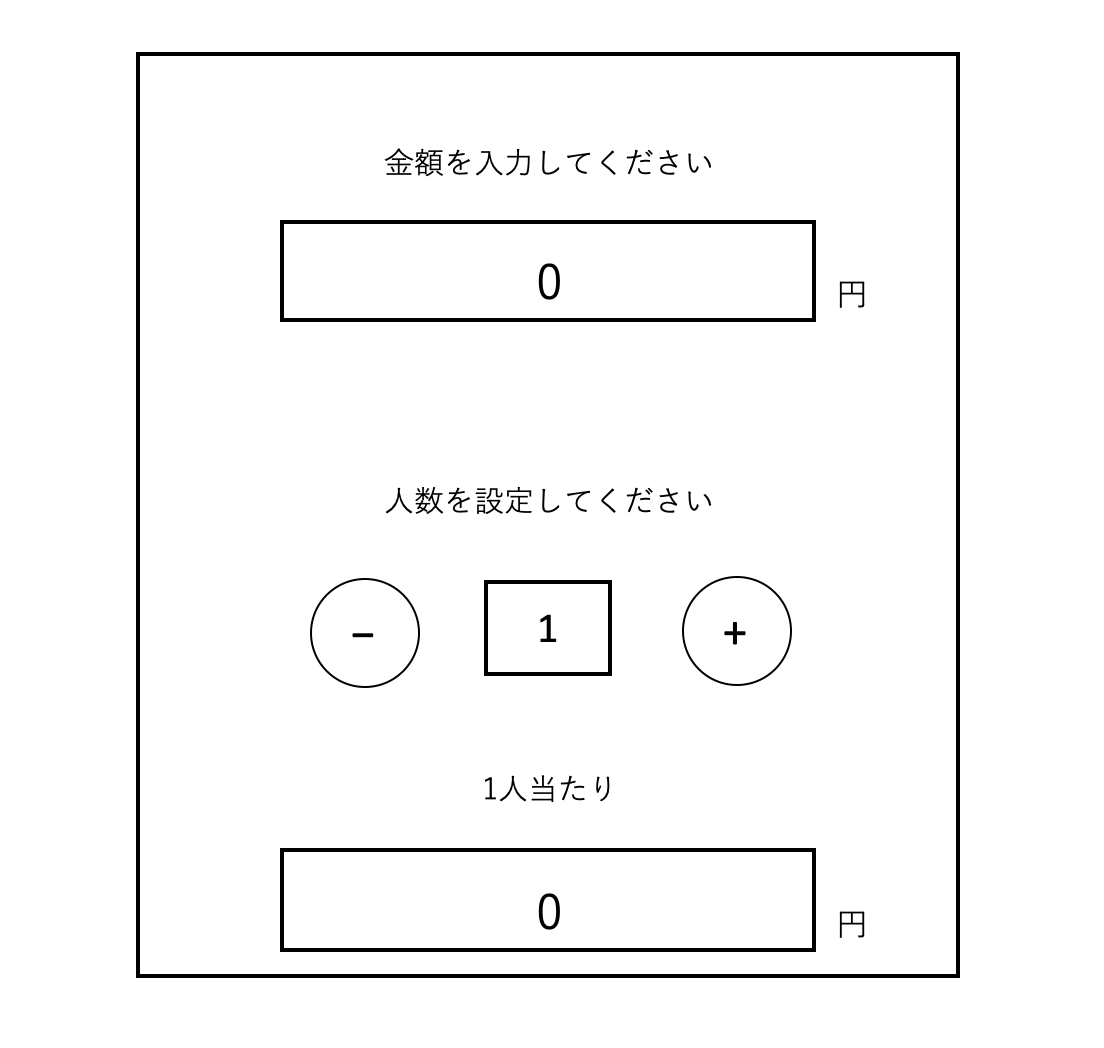
画像のような割り勘アプリを作成するには部品が何個必要で、どのようにコードを書けば良いのかイメージしましょう。
ウィジェットを画面に配置する
設計書で電卓の完成品のイメージができましたら、次はウィジェットを画面に配置していきましょう。
今回は合計金額のところはテキストフィールドで表示するようにします。
calc.py
|
1 2 3 4 5 6 7 8 9 10 11 12 13 14 15 16 17 18 19 20 21 22 23 24 25 26 27 28 29 30 31 32 33 34 35 36 37 38 39 40 41 42 43 44 45 |
import tkinter as tk # メインウィンドウを作成 baseGround = tk.Tk() # ウィンドウのサイズを設定 baseGround.geometry('500x600') # 画面タイトル baseGround.title('割り勘アプリ') # ラベルやボタンの作成と配置 label1 = tk.Label(baseGround,text = '合計金額を設定してください。', font=("MSゴシック", "20")) label1.place(x=50, y=10, width=400, height=50) txtField = tk.Entry() txtField.place(x=150, y=60) button1 = tk.Button(baseGround,text = 'OK' , font=("MSゴシック", "10")) button1.place(x=350, y=60, width=30, height=30) selectedTax = '0' label2 = tk.Label(baseGround,text = selectedTax + '円', font=("MSゴシック", "35", "bold"), background='lightgray') label2.place(x=50, y=100, width=400, height=50) label3 = tk.Label(baseGround,text = '人数を設定してください。', font=("MSゴシック", "20")) label3.place(x=50, y=230, width=400, height=50) label4 = tk.Label(baseGround,text = '1' , font=("MSゴシック", "35", "bold"), background='lightgray') label4.place(x=220, y=300, width=50, height=50) button1 = tk.Button(baseGround,text = '−' , font=("MSゴシック", "35")) button1.place(x=100, y=300, width=50, height=50) button2 = tk.Button(baseGround,text = '+' , font=("MSゴシック", "35")) button2.place(x=350, y=300, width=50, height=50) label5 = tk.Label(baseGround,text = '1人当たり' , font=("MSゴシック", "20")) label5.place(x=50, y=450, width=400, height=50) tax = '0' label = tk.Label(baseGround,text = tax + '円', font=("MSゴシック", "35", "bold"), background='lightgray') label.place(x=50, y=500, width=400, height=75) baseGround.mainloop() |
出力結果
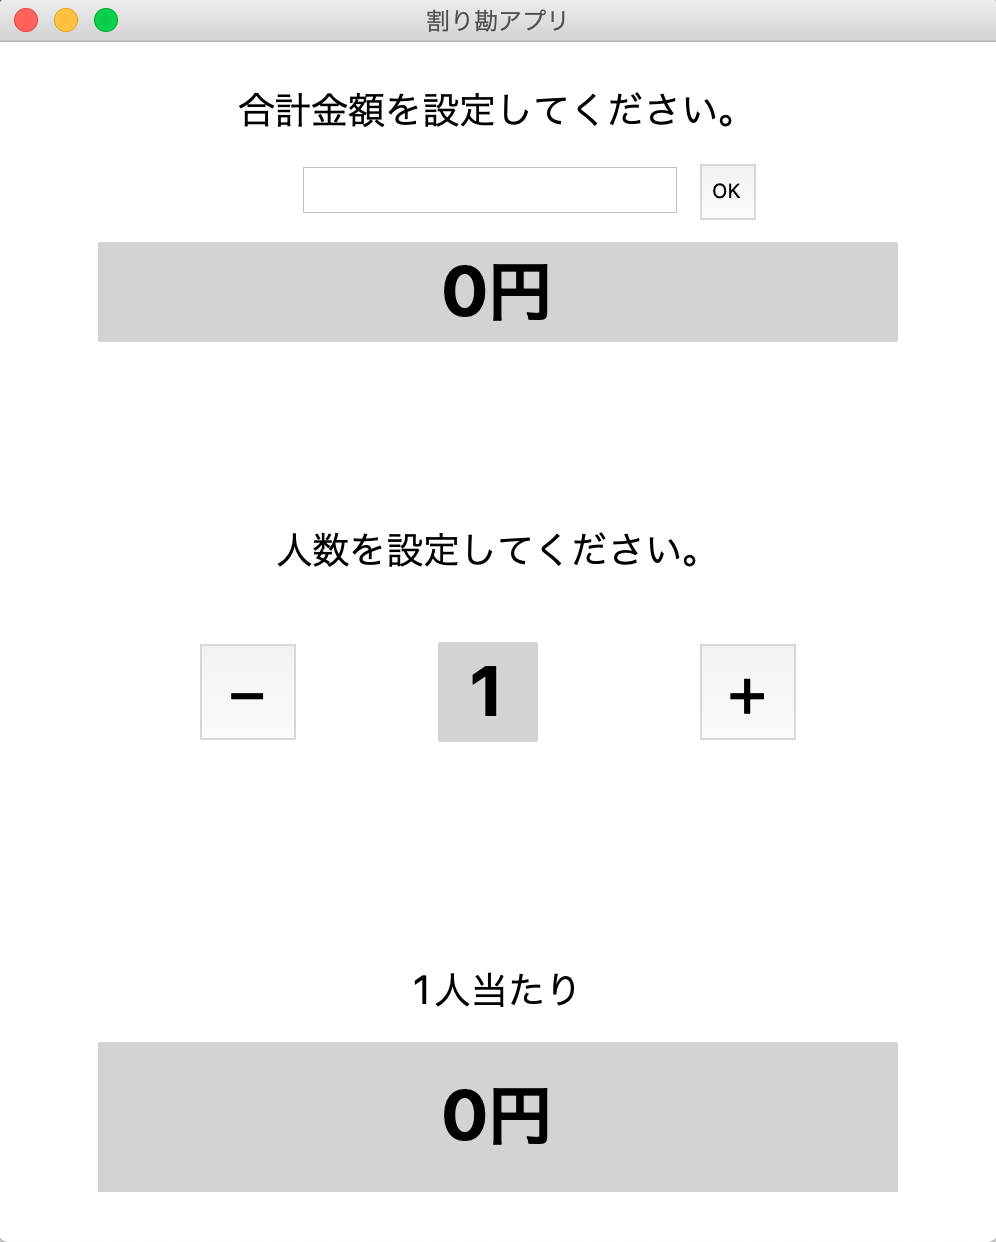
ウィジェットを画面に配置することができました。
ボタンを押した時のイベントを設定する
ウィジェットを画面に配置することができましたら、ボタンを押した時のイベントを設定します。
ボタンを押した時のイベントは以下のように設定していきます。
⚫︎ OKボタン:
押すとラベルに合計金額が表示される
⚫︎ +ボタン:
押すと人数が+1され、自動で1人当たりの金額が表示される
⚫︎ -ボタン:
押すと人数が-1され、自動で1人当たりの金額が表示される
sample.py
|
1 2 3 4 5 6 7 8 9 10 11 12 13 14 15 16 17 18 19 20 21 22 23 24 25 26 27 28 29 30 31 32 33 34 35 36 37 38 39 40 41 42 43 44 45 46 47 48 49 50 51 52 53 54 55 56 57 58 59 60 61 62 63 64 65 66 67 68 69 70 71 72 73 |
import tkinter as tk def click_btnOK(): global tax tax = txtField.get() label2['text'] = tax + '円' def click_btnPlus(): person = label4['text'] person_Int = int(person) person_Int = person_Int + 1 label4['text'] = person_Int tax_Int = int(tax) result = tax_Int / person_Int result_Str = str(round(result)) label6['text'] = result_Str + '円' def click_btnMinus(): person = label4['text'] person_Int = int(person) person_Int = person_Int - 1 label4['text'] = person_Int tax_Int = int(tax) result = tax_Int / person_Int result_Str = str(round(result)) label6['text'] = result_Str + '円' # メインウィンドウを作成 baseGround = tk.Tk() # ウィンドウのサイズを設定 baseGround.geometry('500x600') # 画面タイトル baseGround.title('割り勘アプリ') # ラベルやボタンの作成と配置 label1 = tk.Label(baseGround,text = '合計金額を設定してください。', font=("MSゴシック", "20")) label1.place(x=50, y=10, width=400, height=50) txtField = tk.Entry() txtField.place(x=150, y=60) button1 = tk.Button(baseGround,text = 'OK' , font=("MSゴシック", "10"), command = click_btnOK) button1.place(x=350, y=60, width=30, height=30) selectedTax = '0' label2 = tk.Label(baseGround,text = selectedTax + '円', font=("MSゴシック", "35", "bold"), background='lightgray') label2.place(x=50, y=100, width=400, height=50) label3 = tk.Label(baseGround,text = '人数を設定してください。', font=("MSゴシック", "20")) label3.place(x=50, y=230, width=400, height=50) label4 = tk.Label(baseGround,text = '1' , font=("MSゴシック", "35", "bold"), background='lightgray') label4.place(x=220, y=300, width=50, height=50) button1 = tk.Button(baseGround,text = '−' , font=("MSゴシック", "35"), command = click_btnMinus) button1.place(x=100, y=300, width=50, height=50) button2 = tk.Button(baseGround,text = '+' , font=("MSゴシック", "35"), command = click_btnPlus) button2.place(x=350, y=300, width=50, height=50) label5 = tk.Label(baseGround,text = '1人当たり' , font=("MSゴシック", "20")) label5.place(x=50, y=450, width=400, height=50) tax = '0' label6 = tk.Label(baseGround,text = tax + '円', font=("MSゴシック", "35", "bold"), background='lightgray') label6.place(x=50, y=500, width=400, height=75) baseGround.mainloop() |
出力結果
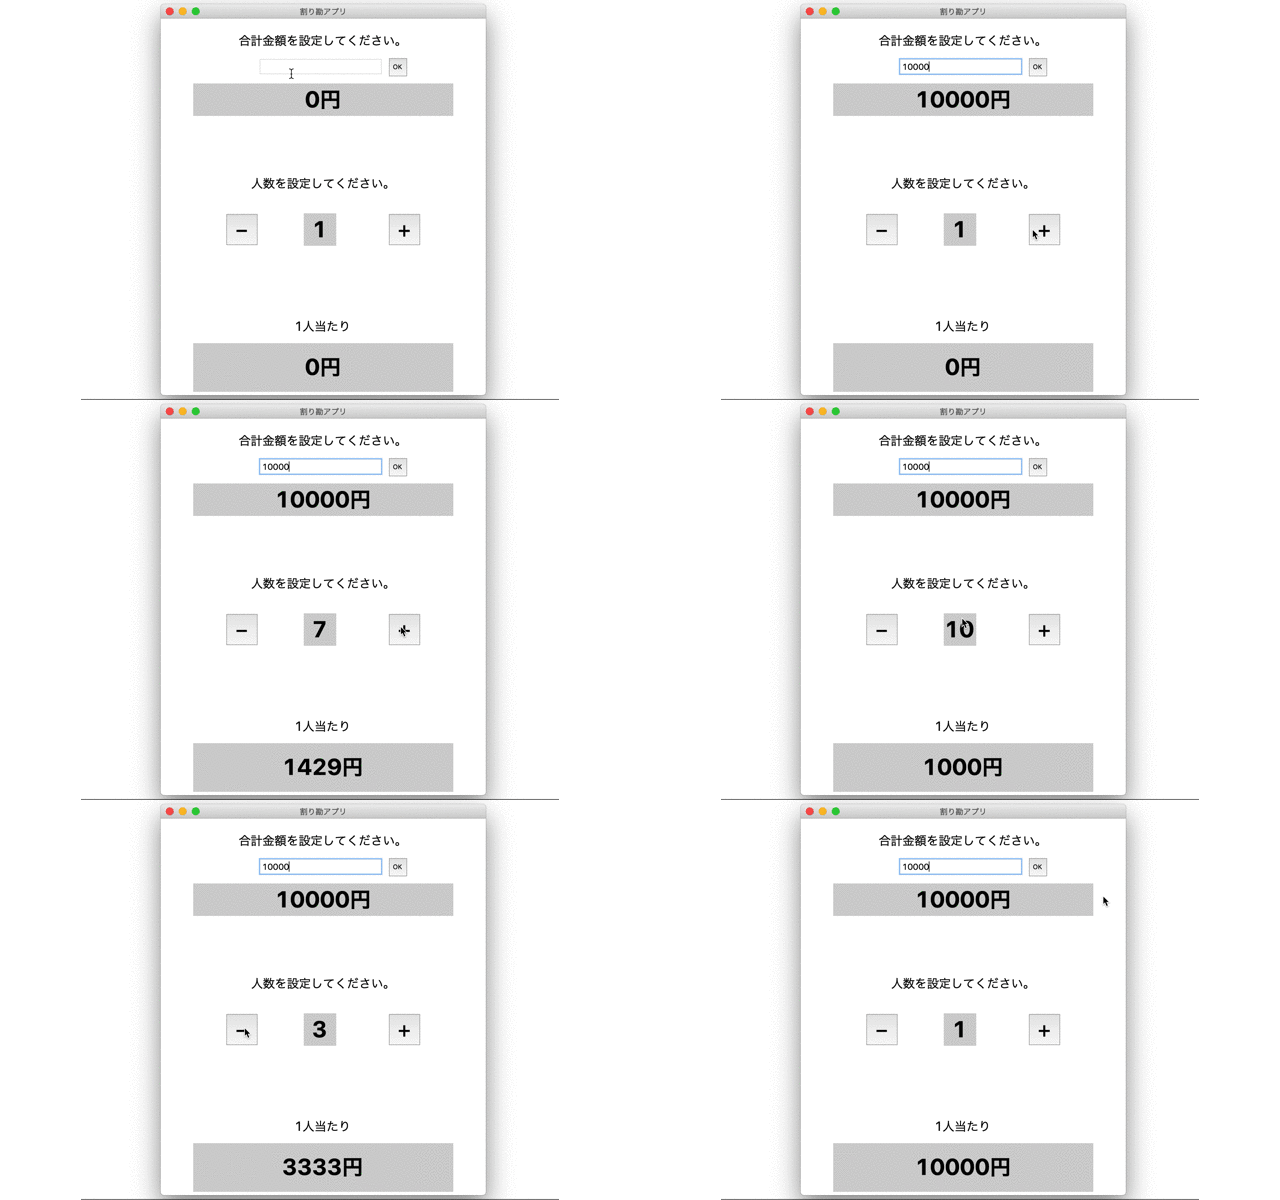
これで割り勘アプリの基本的な動きが完成しました。
例外処理を設定する
割り勘アプリの基本的な動きが完成しましたら、最後に例外処理を設定していきましょう。
例外処理は以下のような場合が挙げられます。
⚫︎ 人数が0の状態で「-」ボタンを押した場合「0」で固定する
⚫︎ 人数が99の状態で「+」ボタンを押した場合「99」で固定する
これらの例外処理を条件文で制御していきます。
sample.py
|
1 2 3 4 5 6 7 8 9 10 11 12 13 14 15 16 17 18 19 20 21 22 23 24 25 26 27 28 29 30 31 32 33 34 35 36 37 38 39 40 41 42 43 44 45 46 47 48 49 50 51 52 53 54 55 56 57 58 59 60 61 62 63 64 65 66 67 68 69 70 71 72 73 74 75 76 77 78 79 80 81 |
import tkinter as tk def click_btnOK(): global tax tax = txtField.get() label2['text'] = tax + '円' def click_btnPlus(): person = label4['text'] person_Int = int(person) if person_Int < 99: person_Int = person_Int + 1 label4['text'] = person_Int tax_Int = int(tax) result = tax_Int / person_Int result_Str = str(round(result)) label6['text'] = result_Str + '円' else: label4['text'] = '99' def click_btnMinus(): person = label4['text'] person_Int = int(person) if person_Int >= 1: person_Int = person_Int - 1 label4['text'] = person_Int tax_Int = int(tax) result = tax_Int / person_Int result_Str = str(round(result)) label6['text'] = result_Str + '円' else: label4['text'] = '0' # メインウィンドウを作成 baseGround = tk.Tk() # ウィンドウのサイズを設定 baseGround.geometry('500x600') # 画面タイトル baseGround.title('割り勘アプリ') # ラベルやボタンの作成と配置 label1 = tk.Label(baseGround,text = '合計金額を設定してください。', font=("MSゴシック", "20")) label1.place(x=50, y=10, width=400, height=50) txtField = tk.Entry() txtField.place(x=150, y=60) button1 = tk.Button(baseGround,text = 'OK' , font=("MSゴシック", "10"), command = click_btnOK) button1.place(x=350, y=60, width=30, height=30) selectedTax = '0' label2 = tk.Label(baseGround,text = selectedTax + '円', font=("MSゴシック", "35", "bold"), background='lightgray') label2.place(x=50, y=100, width=400, height=50) label3 = tk.Label(baseGround,text = '人数を設定してください。', font=("MSゴシック", "20")) label3.place(x=50, y=230, width=400, height=50) label4 = tk.Label(baseGround,text = '1' , font=("MSゴシック", "35", "bold"), background='lightgray') label4.place(x=220, y=300, width=50, height=50) button1 = tk.Button(baseGround,text = '−' , font=("MSゴシック", "35"), command = click_btnMinus) button1.place(x=100, y=300, width=50, height=50) button2 = tk.Button(baseGround,text = '+' , font=("MSゴシック", "35"), command = click_btnPlus) button2.place(x=350, y=300, width=50, height=50) label5 = tk.Label(baseGround,text = '1人当たり' , font=("MSゴシック", "20")) label5.place(x=50, y=450, width=400, height=50) tax = '0' label6 = tk.Label(baseGround,text = tax + '円', font=("MSゴシック", "35", "bold"), background='lightgray') label6.place(x=50, y=500, width=400, height=75) baseGround.mainloop() |
出力結果
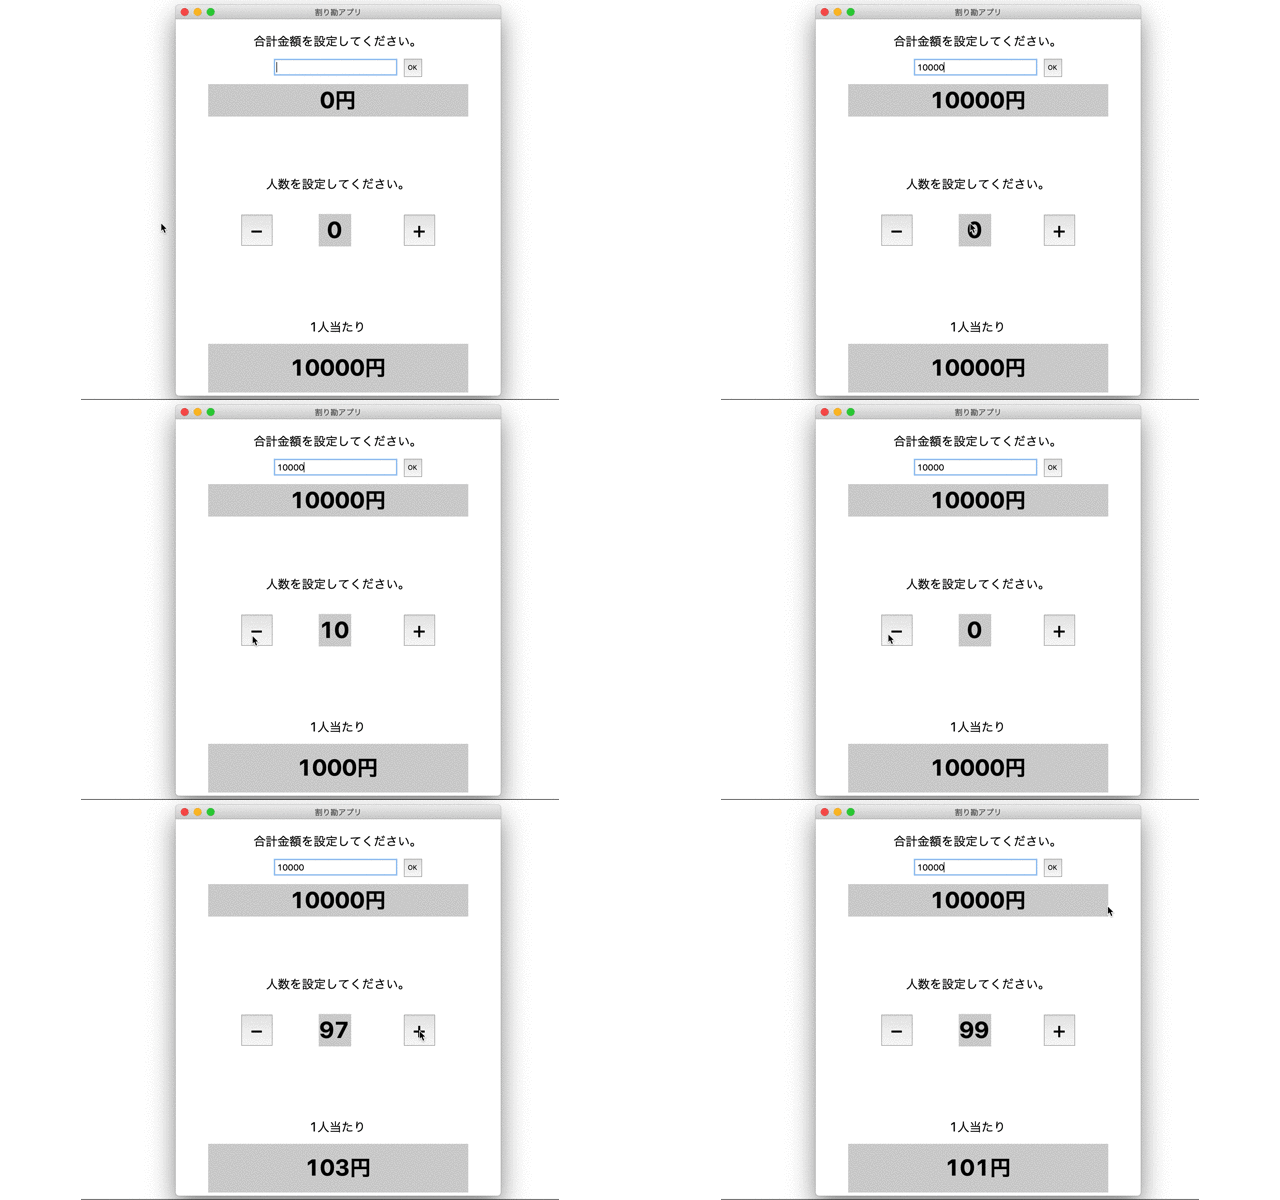
これで例外処理の設定が完了しました。
人数が「0」の場合に-ボタンを押しても負の整数が表示されません。
また、人数が「99」の場合に+ボタンを押しても100以上の数字は表示されません。
まとめ
今回はtkinterを使って割り勘アプリを作成してみました。
+や-を押すと人数が設定されて、それと同時に1人当たりの金額が変化していく動きであるため、飲食店のタブレットにあるような割り勘機能に限りなく近いのではないかと思います。
しかし、もう少し、コードを短くしてまとめることができると思いますのでそこは調整していきたいですね。
ST
株式会社flyhawkのSTです。フライテックメディア事業部でのメディア運営・ライター業務なども担当。愛機はMac Book AirとThinkPad。好きな言語:swift、JS系(Node.js等)。好きなサーバー:AWS。受託開発やプログラミングスクールの運営をしております。ご気軽にお問い合わせください。


